Top_Motori
Motori
Ribbon: Top Mechanical Draw > Mechanical Library > Engines
A particular function to draw engines.
Tabella 19. Engine Library Table
IM B3 IM 1001 |
IM B35 IM 2001 |
IM B5 IM 3001 |
IM B34 IM 2101 |
IM B14 IM 3601 |
|
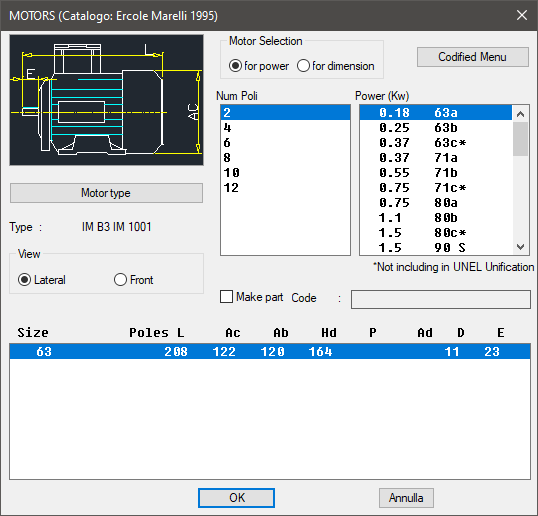
To set the type and the parameters of a motor, a simple and intuitive dialogue-box is opened with the appropriate commands described hereinafter.
As for all standard libraries, it is possible to create a part and insert automatically in the material’s slip the parts used. The code of the motor’s part is customizable by editing the value in the appropriate space.
If the box is left empty, the code will be created automatically. Click on Codified Menu and a dialogue box appears and allows the user to select a specific connector between all those codified.
- What
- Displays a dialogue-box to set the type and the specific parameters of a motor to insert in the drawing.
- Why
- For the correct drawing of standard electric motors by selecting in the available list the desired line containing the essential characteristics.
- How
- On the top of the dialogue-box opened with the button Top_Motori is possible to select the motor according to the power characteristics, or according to the dimensions.
If you choose the option according to the power, set the motor by selecting the poles and the power (Kw), then the application will display in the centre of the dialogue-box all available dimensions.
If you choose the option according to the dimensions, set the motor by selecting in the central part of the dialogue the corresponding dimension, then the application will display in the top part of the dialogue-box all the corresponding powers corresponding to the value.

It is possible to specify at the top left side of the dialogue-box the type of motor by selecting the type. It is set selecting the button Tipo Motore (Type of Motor), or modifying the left side of the image. Click on the right side to set the view type. Specify the insertion point and insertion angle to insert the motor in the drawing, then press the button OK.
(Dialogue...) Insertion Point: Insertion Angle:
