Top_Seeger

Draw Snap Rings (Seegers)
Ribbon: Top Mechanical Draw > Mechanical Library > Feather > Seeger
With TOP the user disposes of a series of standard seegers that can be managed using a dedicated dialogue box.. The only important parameter to draw the ring the user can modify is the shaft’s diameter to combine to.
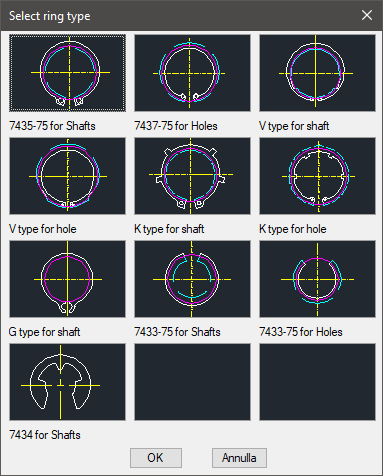
Tabella 6. Seeger Standards Table
A (for shafts) |
UNI 7435, UNI 7433 |
B (for Holes) |
UNI 7437 UNI 7433 |
V e K (for shafts and holes) |
|
G (for shafts) |
|
UNI 7434 (for shafts) |
UNI 7434 |
- What
- Draws a snap ring conformingly to UNI standards which face or lateral view.
- Why
- To insert in a drawing a snap ring conform to UNI standards, and possibility to create a part and manage the element in the material’s BOM.
- How
- For each ring is possible to choose to draw the front view or the sectional view. For the sectional view, it is possible to draw only the seating, only the seeger, or both. To select the type of seeger, click with the pointing device on the image in the dialogue-box, or enter the button Seeger… which displays another dialogue-box with all the types of rings. In this case just select the image of the desired ring. The main dialogue-box lists all the possible diameters for the seeger currently selected. If the diameter of the shaft or of the hole where the ring should be placed is unknown, click on the button "Diam.Shaft <" to temporarily exit the dialogue box to select the two points which define the shaft’s diameter. While selecting the two points, first is active the osnap function Near, then Perpendicular. Once selected the shaft, enter again the dialogue-box, and the diameter is highlighted in the list. If the diameter is not in the list, the closest one is highlighted.
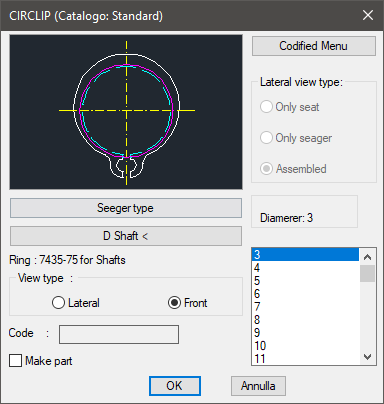
In the dialogue-box there is a text line which displays the currently selected seeger type. A less important available button is the one regarding the part. It can create the part of the snap ring. This button is available only when the overall, and not the seating, is drawn.
The code of the seeger’s part is customizable by editing the value in the appropriate space. If the box is left empty, the code will be created automatically. Click on Codify Menu and a dialogue box appears and allows the user to select a specific seeger between all those codified.
Once set the ring to draw, press OK, then insert the layering point and the insertion angle.
Example 124. Draw Snap Rings (Seegers)
Command: Top_Seeger <ENTER> (Dialogue...)
Insertion Point: Insertion Angle <0>: <ENTER>