Top_Viti

Draw Screws
Ribbon: Top Mechanical Draw > Mechanical Library > Screw
With TOP the user disposes of a series of standard screws that can be managed using a dedicated dialogue box.. The user’s manageable parameters are the diameter and the length. In addition, it is possible to insert a nut, two washers, or a tapped blind or through hole.
Tabella 2. Screw’s Library Standards Table
Hexagonal Head |
UNI 5737 - 5738 - 5739 - 5740 |
Cylindrical Head with embedded hexagon |
UNI 5931 |
Flat Countersunk Head with embedded hexagon |
UNI 5933 |
Cylindrical Head with linear built-in |
UNI 6107-67 |
Cap Countersunk Head with linear built-in |
UNI 6110 |
Hexagonal Head with modified shank |
UNI 9210 |
Cylindrical Head with modified shank |
UNI 7379 |
Convex Head with embedded hexagon |
UNI 73804 |
- What
- Allows to draw the screws in lateral, rotated or plan view.
- Why
- To insert in the drawing any type of UNI-standardized screws or bolts, with and without their respective washers, with the possibility to create more parts and handle the elements in the material’s slip.
- How
- In order to easily and rapidly handle the drawing of the screws, a dialogue box is available which describes the main parameters of the screw on which you can act, as well as a window displaying the screw’s preview. Thanks to the dialogue box, it is possible, on one hand, to draw a simple screw, and on the other hand, it is possible to implement the screw with a washer under the head, with a nut (the same nuts of the command Top_Dadi are available) and one or two washers under the nut. It is also possible to insert, in the absence of the nut and its washer, a tapped blind or through hole.
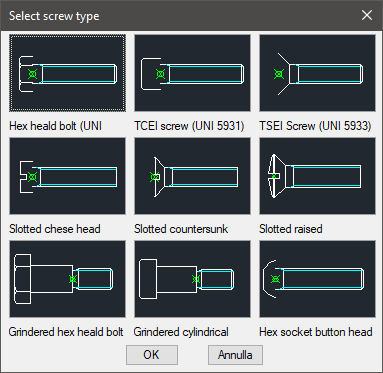
Select the left part of the screw’s drawing to rotate it along the longitudinal axis or have a plan view. Select the right part to insert a blind hole or a through hole or none (to draw a hole, the nut and washer are automatically erased). In the dialogue-box there is a section dedicated to select pitch type: Thick or Thin. According to the selection made, the list of selectable diameters and the list of each diameter’s length will be modified. The length of the tapped blind hole is set according to the diameter and its pitch. In the list of diameters are highlighted with an asterisk “*” all the less used or those not advised to be used. This signal is also used for the list of lengths. For a specific diameter can exist one or more lengths, which also the UNI tables do not advise to use. In the dialogue are also available a pair of buttons which can set which threading to use for the screw to draw: TOTAL or PARTIAL. However, it is not always possible to use these buttons as not all types of screws are fully or partially threaded. In the middle of the dialogue box, under the abovementioned image, there are some buttons that allow the user to choose the type of screws, nuts and washers. The first type mentioned is "Screws..." and a new dialogue box appears: it shows all the types of screws that the user can select. Once selected the new type of screw, the user will be redirected automatically to the screws main dialogue box.
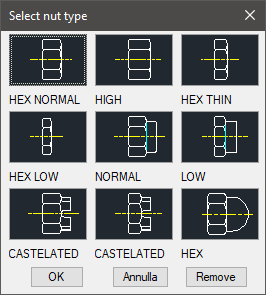
The second button is called "Nuts…" and it allows to select a new type of nuts, which can be added to the screw’s shank. When selected, the same dialogue box will appear for the single nuts command. This button will be disabled automatically in case the screws are dedicated to a hole: in fact, it is not possible to insert a nut and a hole at the same time.
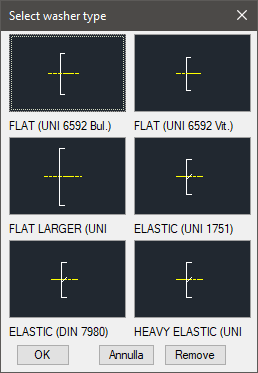
The other buttons refer to the choice of the type of washers to add under the screw’s head or under the nut’s base. These buttons are respectively called R.T., R.D. 1 and R.D. 2. The first button will be disabled during the use of countersunk head screws because it is impossible to use a washer in this case; the second and the third button, however, will be disabled when the nut will also be disabled, i.e. when there is a hole. The buttons refer to a dialogue box to select the type of washer (see command to insert single washer). The type of screws, nuts and washers is described in specific text lines under the buttons.
Another important button is Dist.<: in fact, it allows to close, for a while, the dialogue box, in order to insert manually (use two points or digit a number) the step distance between the screw head (or its washer) and the nut base (or its washer).
When there is no nut, but a through hole, this function allows the user to set the distance between the base of the screw head and the end of the hole. In both cases, the screw length is automatically set. In the first case, the length is set according to a theoretical nib of the screw (which is set in the box Sporg ) towards the nut. Whereas, in the second case, the length is set according to the length of the screw the closest to the selected distance. When there is no nut nor through hole with the selected distance, the screw length will have to be defined.
The user can also use: a button to confirm the creation of the parts and three lists created in order to choose the type of material to be used for the screw, for potential nuts or washers. The codes of the screw part and its relative components (potential nut and/or washers) can be customized when the values of the specific spaces are edited. If such boxes are left empty, the codes will be created automatically. To do so, when you click on Codify Menu, a dialogue box appears and allows the user to select a specific screw and only the codified ones.
When all the choices for the screws drawing have been made, click on the button OK: the dialogue box will shut down and it will be possible to insert the layering point and the rotation angle of the screw.
Command: Top_Viti <ENTER> (Dialogue...)
Insertion Point: Insertion Angle <0>: <ENTER>
|
Nota |
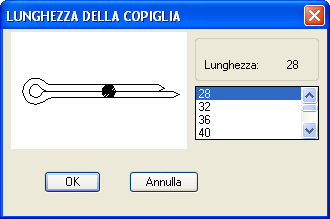
In case a castle nut is selected, the length of the pin is requested in a small dialogue-box which is displayed after the main dialogue has been closed and before the screw drawing.
In the dialogue-box of the washers and nuts will be displayed the button Remove. It eliminates from the drawing the object in question in the dialogue: If a nut is removed, also its washer is removed. |
![[Nota]](lib/imgnote70.png)