Top_Lente

Detail (“Detail Part”)
Ribbon: Top Annotations > Detail > Detail
- What
- This command zooms a circular or a polygonal area and creates a part .X (X stands for 1, 2, 3,…, N). This part, also called “detail part”, does not appear in the slip, and must be activated before to dimension the zoom. Thus, the dimensions automatically take the values in full scale. Finished, exit the detail part.
- Why
- Highlight certain important details in an overall drawing.
- How
- Enter the command, and the following dialogue-box is displayed to fill in the description (if not drawing a connecting link between the detail and the zoom), the zoom scale,
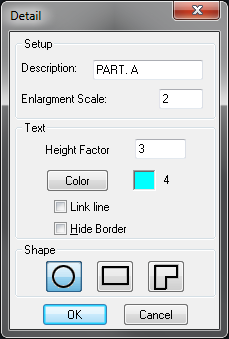
text height factor, and the colour used to describe the detail (as default is set the same colour as for Thin Continuous linetype).
From here you can also indicate whether you want to create the connecting link between the area of origin of the detail and the true detail, and if you want to make sure that the detail outline is visible or not.
It is possible to select at the bottom the shape to give at the zoom: circular, rectangular or customized polygon. Once done these settings, insert the zoom in the drawing: for circular insert centre and radius of the detail; for rectangular insert two points to set the rectangle; for a polygon set by the user, insert the points which define the desired shape. To end press ENTER or select again the first point. In the first case the polygon will be closed uniting the first point to the last.
When the "Hierarchical Filter" is enabled, the commands that manage the parts detail (Detail, Detail Update, Edit Detail) process only the geometry of the current and of his daughters. However, if the control is disabled, the commands will accept the geometries of all the parts unlocked.
Command: Top_Lente… <ENTER> (Fill-in
dialogue-box).. OK <ENTER> Centre of detail: 5.4
<ENTER> Zoom radius <4.5>: 3 <ENTER> Place
zoom:
|
Nota |
If the current text style (in AutoCAD environment) has a default height – which is not 0.000 – the inserted text height is ignored. |
![[Nota]](lib/imgnote62.png)
|
Nota |
Independently by the colour used, the detail’s edge and the connection link are drawn with the "Continuous Thin" linetype. |
![[Nota]](lib/imgnote61.png)
|
Nota |
The Point entity type are eliminated once starting to draw the detail. |
![[Nota]](lib/imgnote60.png)
|
Nota |
In the zoomed detail, the entities as blocks, hatching and dimensions which intersect with the break point (detail outline) are exploded. |
![[Nota]](lib/imgnote59.png)
|
Nota |
If the option "Keep in Detail Colour of Illuminated Lines" is active, the entities of the created detail will keep as main colour the colour set for the illuminated lines on the origin part. |
![[Nota]](lib/imgnote58.png)
|
Nota |
When you select the hide outline option, the detail edge is, however, inserted into the drawing but "off". As a consequence, if by chance the detail should be moved its outline runs the risk of remaining in the old position and it may bring the detail back to its place if you try to update it. If you want to move the detail we recommended to use the command "edit detail".modifica dettaglio". |
![[Nota]](lib/imgnote57.png)