Top_Rosette

Draw Washers
Menu: Top > Library > Bolts and Nuts > Washers
With TOP the user disposes of a series of standard washers that can be managed using a dedicated dialogue box.. The only important parameter to draw a washer the user can modify is the diameter.
Tabella 5. Washer Standards Table
For VTE bolting |
UNI 6592 |
For VTCEI-VTCI screws |
UNI 6592 |
INCREASED |
UNI 6593 |
ELASTIC for VTE |
UNI 1751 |
ELASTIC |
UNI 9195 |
ELASTIC HEAVY |
UNI 9195 |
- What
- Draws a single washer conformingly to UNI standards. The washer is viewed only laterally.
- Why
- To insert in a drawing a washer conform to UNI standards, and possibility to create a part and manage the element in the material’s slip.
- How
- A dialogue-box opened by the command displays: the list of possible diameters for the selected washer; an image of the washer; a button to select the types of washers. The current diameter and type of washer are also displayed.
It is possible to select the view of the washer with the appropriate command in the dialogue.
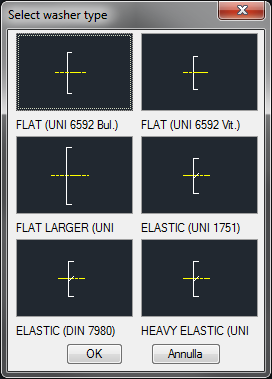
There are two methods to select a washer between those listed in the library. Through another menu, activated with the button Washer…, or press the selection button of the pointing device on the image of the washer. In this case the drawing changes and the list of diameters is updated.
A button allows the user to confirm the creation of the washer’s part. The washer’s code can be customized if the value is edited in the appropriate space. If the box is left empty, the code will be created automatically. Click on Codify Menu and a dialogue box appears and allows the user to select a specific washer between those previously codified. The dialogue box allows to quickly and easily select and draw the washer. Once selected the type of washer, insert the layering point and the insertion angle, which can be set the pointing device.
Command: Top_Rosette <ENTER> (Dialogue...)
Insertion Point: Insertion Angle <0>: <ENTER>