Top_Golfari
Draw Eyebolts
Menu: Top > Library > Pneumatic > Eyebolts
With TOP the user disposes of a library of standard eyebolts that can be managed using a simple and intuitive dialogue box.. The available eyebolts are described in the standards UNI 2946 and UNI 2948.
As for all standard libraries, it is possible to create a part and insert automatically in the material’s slip the parts used. The code of the eyebolt’s part is customizable by editing the value in the appropriate space. If the box is left empty, the code will be created automatically.
Click on Codified Menu and a dialogue box appears and allows the user to select a specific eyebolt between all those codified.
- What
- Displays a dialogue-box to set the type and the specific parameters of an eyebolt to insert in the drawing.
- Why
- For the correct drawing of eyebolts, with standard dimensions, be selecting the standards and the diameter of the thread.
- How
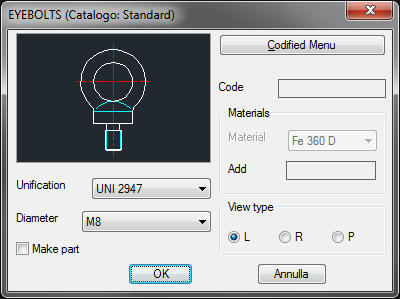
- A dialogue-box displaying the eyebolt’s main parameters is opened to easily and rapidly draw the accessory. The dialogue-box opened with the command Top_Golfari is divided in two main sectors, as described in the image below.

On the top left is displayed the preview of the selected object. Click on the image to change the component’s view.
In the same section, under the image, is displayed a pop-up list to select the part’s standards. Below is displayed a second list to select the diameter of the eyebolt’s thread.
The toggle Make Part inserts the selected component as a part. In the right section is displayed, besides the button Codified Menu described previously, the part destined to insert the code of the eyebolt.
In the section below, while creating a part, select the component’s construction material, which will also determine the coding.
Thus, select the object’s view, which can be: Plan, Lateral or Rotated.
Once confirmed the object to place in the drawing, just insert the object’s layering point and insertion angle.
(Dialog...) Insertion Point: Insertion Angle:
