Top_Ghiere

Draw Lockrings
Menu: Top > Library > Lockrings...
A useful function to draw standard ring nuts conformingly the tables KM-, HM-, and HML-type Collars and "Elastic Stop" type "Self-Locking Collar". It is possible to insert a MB-type Washer in the collars.
The drawing of the collars can be displayed with a section or plan views. Set the type of collar, the view and the dimensions in the appropriate dialogue-box, described hereinafter.
Both for the plan and lateral view, the symmetry axis are drawn with a MIXED THIN line. As for all the other standard libraries, it is possible to create one or two parts (when a washer is inserted) to have all collars, and the washers used, in the material’s BOM.
- What
- The dialogue-box to insert the object in the drawing is displayed to set type of collar and its view.
- Why
- For the correct drawing of standard collars, with the abovementioned tables, without necessarily insert all the necessary values to set the object, but only the essential characteristics as the diameter, the type and the view.
- How
- The dialogue-box to set the type of collar is composed by the image of the object’s preview. On the right side of the image is possible to change the type of collar, on the left side change the type of view.
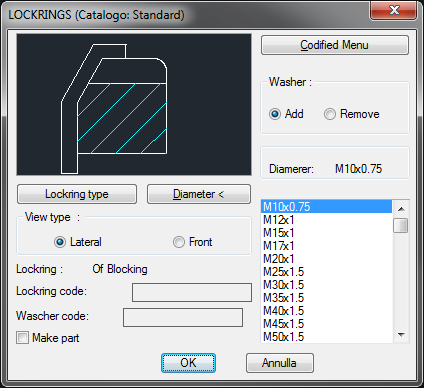
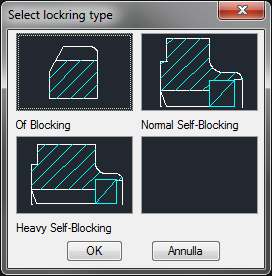
Under the image there is the button "Lockrings...", to open a new dialogue-box with all the types of collars available to set as current.
Under this button there is a text line with currently selected object.
On the right of the dialogue-box there are two buttons to activate or deactivate the collar’s washer (these buttons will be deactivated in case of self-locking collars since they do not have washers). Under there is the button Diameter < to temporarily close the dialogue-box , go to the drawing and select the diameter of the collar, setting a couple of points (when the shaft where to place the collar is identified). It is also possible to select the diameter with the list below which lists all the possible diameters for each collar.
Next to the button to confirm the selected object there is a box to activate the creation of a part. The codes of the parts of the collars, and washers, can be customized editing the values in the specific spaces. If such spaces are left empty, the codes will be created automatically. Click on Codify Menu and a dialogue box appears and allows the user to select a specific collar between all those codified.
Once confirmed the type of collar to place in the drawing, just insert the object’s layering point and insertion angle.
(Dialogue...) Insertion Point: Insertion Angle: