Top_EditForiLib
Customize Top's Hole and threads
Menu: Top > Customize > Hole and Threads Editor
- What
- This command allows the user to manage the information of holes and threads and to manage its list of favourite holes. While using it you should pay particular attention since it changes the data source that TOP uses in the drawing of library components.
- Why
- It gives the user a convenient interface to edit the .Prs file, containing the threads data.
- How
- After the command is launched and confirmed the message of accountability, users will shown the following interface. As we can see the window is divided into two main parts: the upper section handles the true thread standards, while the lower part shows the holes defined by every thread standard.
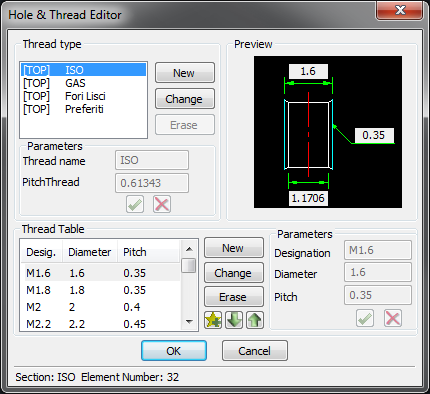
To analyze in detail the dialogue in an orderly fashion, the thread standards currently defined are shown at the top part. In particular the native standards of the application are preceded by the prefix [TOP] while the standards defined by the user are preceded by [USER]. To the left of this list we have a series of buttons that allow us to add a new standard, to edit the currently selected one and even to delete it. This last operation is allowed only for the standards defined by the user. When you choose to add a new standard or to modify a selected one, a section of parameterization will be made available just below, in which you can enter the standard name and the constant-pitch thread. Once added or edited these information you can choose to save the changes or not by clicking the more appropriate little button.
The lower section shows the list of holes according to the standard selected in the top section. From here you can define new holes, modify the existing ones or delete the least used. It is also possible to add the hole that is currently selected in bookmarks (gold star button), or reorder the list through the two arrows that move the selected hole further up or further down one line at a time. If you choose to add a new hole, or edit an existing one it will be made available the section of parameterization on the right of the list. From here, it will be necessary to insert a unique string to identify the hole, its value of diameter and, in case it is not between the smooth holes, its pitch value. Depending on the values entered you will see a real-time update of dimensions on the hole preview, so you can have an idea about the hole that you are defining.
All the changes you make will not be saved until you exit the dialogue with the OK button. If you press CANCEL any changes will be cancelled.