Top_DialogFori

Holes
Menu: Top > Library > Holes
- What
- Recalls a dialogue box where you can enter in the drawing any type of holes or slot in any view.
- Why
- Serves to quickly and precisely insert in the drawing any type of holes according to legislation.
- How
- Once entered the command, user will be shown the following interface. By analyzing it from top to bottom the first line represents the selection of the belonging group, that is to say what we want to see in the underlying menu. The star represents the Favourites, by clicking on it you will be only shown the holes added among bookmarks through the appropriate Editor. Instead, to its left, through the drop-down menu we can choose the unification from which we intend to insert a hole. In the case a smooth hole is set we won’t have any choice but to insert a smooth hole; in case of threaded hole you can choose between ISO, GAS and any other unifications defined by user in the editor.
Going downward on the left there is a special control panel through which we can select what we have to draw. The first couple of buttons at the top is the choice between Slot and Hole, just below (available only for the holes) the choice between Smooth and Threaded. Further below we have the possibility to choose the view, if Lateral or Plan, and the type of hole between Through and Blind. The last group of buttons at the bottom represents the mouth of the hole or slot and can be Normal, Countersunk and Counterbored. To the right of the control panel we can see the list of available holes, among which you can choose with a simple double-click of the mouse.
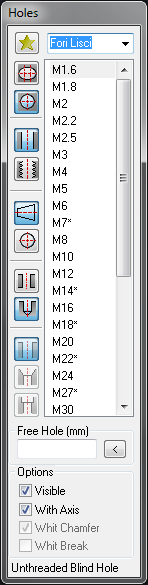
At the bottom of the dialogue there is a section where you can enter in the drawing a hole with a free diameter (operation permitted only from smooth holes), both by typing the value in the special edit-box and taking it from the graphics area through the small button "<". Finally, at the bottom we have a series of options on the hole drawing, if visible or hidden, draw it with or without axis of symmetry, with or without chamfer (in case of threaded hole), or with or without the fissure (in the case of blind threaded hole). At the bottom of the dialogue, finally, we have a summary bar of the choices made.
The dialogue behaves in a modal way compared to the drawing, this means that it will remain active also in the insertion phase of the hole. In this circumstance if we act on it we will see the hole that we are inserting adapting in real time to the new settings, both of diameter and of drawing.
For threading customization, please refer to the command Top_EditForiFil, described in the chapter on personalization commands.
(Dialogue...) Insertion Point: Insertion Angle: