Top_Cuscinetti

Deep groove ball bearings
Menu: Top > Library > Bearings > Deep groove ball bearings
A useful function to draw the most common bearings according to the SKF catalogue tables.
Tabella 9. Deep groove ball bearings standard table
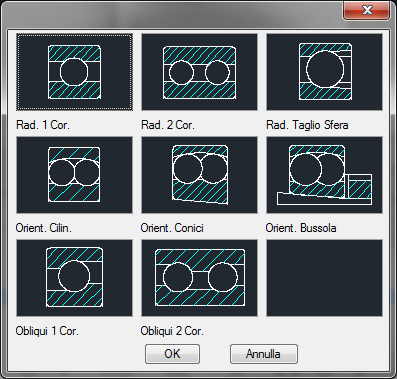
Radial Single Row |
Radial Double Row |
Radial Single Row Cutting Ball |
Self-aligning ball bearings (cylindrical) |
Self-aligning ball bearings (conical) |
Self-aligning ball bearings on sleeves |
Single direction angular contact thrust ball bearings |
Double direction angular contact thrust ball bearings |
The image of the bearings is displayed with section or front view. To set the view, the type and the parameters of one of the categories previously described, a simple and intuitive dialogue-box is opened with the appropriate commands described hereinafter. When the bearing is inserted the symmetry axis are drawn with a MIXED THIN line.
As for all standard libraries, it is possible to create one or more parts (when a adapter sleeve for adjustable ball bearings or when a single or double acting thrust bearing race is present) and insert automatically the parts used in the material’s BOM.
- What
- Displays a dialogue-box to set the type of radial ball bearing, and its parameters, to insert in the drawing.
- Why
- For the correct drawing of standard radial ball bearings, with the abovementioned tables, without necessarily insert all the necessary values to set the object, but selecting in the available list the desired line containing the essential characteristics as the inner diameter, the outer diameter, the thickness, etc…
- How
- The dialogue-box opened with the command Top_Cuscinetti is divided in four main sectors.
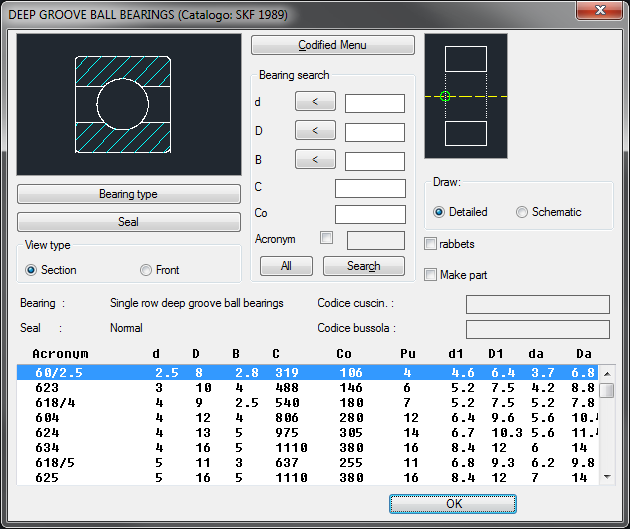
The one on the top left allows to select the type of bearing and seal, just clicking on the icon with the object’s preview, or entering the buttons on "Type of Bearing" and "Seal". Under is possible to select the bearing's view between section and front view. Click directly on the left side of the image to modify the type of bearing, on the right side to modify its type of seal. Enter the button "Type of Bearing" under the image to open a new dialogue displaying all available bearings for the category radial ball bearings, and to select the current one.
Enter the button "Seal" under the button "Type of Bearing" to open a new dialogue-box displaying all the types of seals available for the current bearing.
Under this button there is a text line with currently selected object.
The top central par of the main dialogue-box allows to carry-out an advanced research on the bearing’s main characteristics using, also simultaneously, all available search keys. To search in the current bearings parameters list the bearing with an inner diameter (d) of 30mm and a thickness (B) of 19mm, just insert the value 30 and 19 in the respective boxes and then click on the button "Search". In the list below are listed only the bearings which respond to the settings. To display the bearing’s list, click on the button "All". The buttons with the minus sign (<) give a search value clicking on two points on the screen. To mount a bearing on a shaft in the drawing, press the button < associated to the parameter d (inner diameter), touch perpendicularly the two lines representing the shaft’s section. The diameter is automatically inserted in the box of the dialogue-box, which filters only the corresponding bearings. The button next to the search voice "Abbreviation" sets the research according to the bearing’s abbreviation (unambiguous parameter) or the other available search keys.
In the top right part of the dialogue-box is displayed an icon to select the most appropriate layering point for the user’s needs. Under there are some buttons which indicate if the bearing must be drawn entirely or just its schematic description, to insert the recommended step and create automatically the part of the inserted object. The codes of the bearing’s parts, and relative adapter sleeve, can be customized when the values are edited in the specific spaces. If such values are set, the codes will be created automatically. Click on Codify Menu and a dialogue box appears and allows the user to select a specific bearing between all those codified.
In the bottom part of the dialogue-box is displayed the list of bearings with their parameters. It is possible to display it using the vertical scroll bar and select the most appropriate bearing. Once confirmed the type of bearing to place in the drawing, just insert the object’s layering point and insertion angle.
Example 128. Deep groove ball bearings
(Dialogue...) Insertion Point: Insertion Angle: