Top_Corone

Crown Gear
Menu: Top > Library > Gear > Pinions
A useful function to draw standard rings.
To set the type of ring, a simple and intuitive dialogue-box is opened with the appropriate commands described hereinafter.
As for all standard libraries, it is possible to create a part and insert automatically in the material’s slip the parts used. The codes of the parts of the ring and chain can be customized when the values are edited in the specific spaces. If such spaces are left empty, the codes will be created automatically.
Click on "Codify Menu" and a dialogue box appears, and allows to select a specific ring between all those codified.
- What
- A dialogue-box to insert the object in the drawing is displayed to set the type of ring, its view and its parameters.
- Why
- For the correct drawing of rings without plotting all entities which compose it, but reporting only the parameters as the diameter, the width, the height, etc… Makes the drawing much faster.
- How
- The dialogue-box opened with the command Top_Corone is divided in four main sectors.
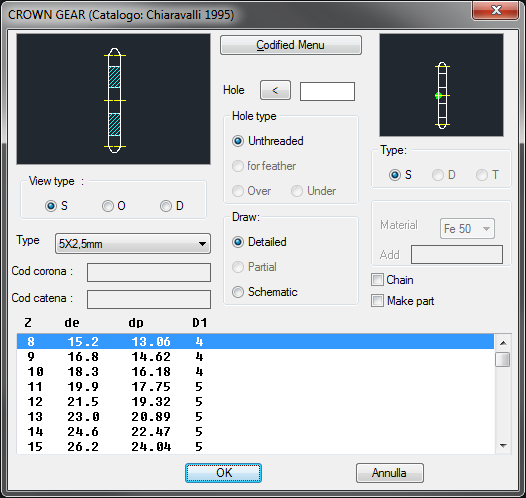
The one on the top left acts on the image, thus click on the left side to modify the type of ring. On the right side to select the type of view. The available rings are: "Simple", "Double" and "Triple", according to the selected type. While the view can be: Sectional, Front and Rear.
Select the drop-down menu "Type" under the image to select the type of ring to set as current. The top-central part of the dialogue-box sets the diameter of the ring’s hole, which should always be between “D1” and “de”. It is possible to set in the same dialogue-box the material to associate to the part created. The type of hole, contrarily to the type of pinions, is always set as smooth. In the top right part of the dialogue-box is displayed an icon to select the most appropriate layering point for the user’s needs (only for sectional view).
Under there is a section to select the ring’s drawing mode: "Complete", "Partial" or "Schematic". For explanation see chapter on pinions.
Select the button "Chain", to insert a chain in the drawing of the ring with a lateral or sectional view.
Once confirmed the type of ring to place in the drawing, just insert the object’s layering point and insertion angle.
(Dialogue...) Insertion Point: Insertion Angle: